Showing posts with label quinoa. Show all posts

Sunday, August 21, 2016

Thai Basil Eggplant

At the farmer's market this weekend, tables were overflowing with eggplants of all shapes, sizes, and colors. They were truly a sight to behold in their different shades and combinations of purples, greens, and whites. 


Different varieties of eggplant*

What seasoned cooks view with admiration and awe, is no doubt a source of anxiety and confusion for those starting out in the kitchen or new to eggplant cookery. To make matters worse, any specific type of eggplant may be called different names depending on where you buy it!

Have no fear! 

The key to eggplant is to get the right shape for the recipe that you're making--regardless of color. 

This is because those of the same shape tend to have the most similar taste, texture, and cooking methods. There are certainly subtle flavor differences between the varieties, however, a dish will generally turn out fine if you substitute a similar shape--but different size or color--eggplant variety. 
Thai Eggplant*

Note: an exception is the small, round, green, Thai eggplant. This one is more crisp and has more small, pronounced seeds than the other varieties and is best not substituted.

The following is a home version of Thai Basil Eggplant--a dish you can find in many Thai restaurants. Don't be confused by the name. "Thai" refers to the type of basil used, NOT the type of eggplant. The best eggplants to use for this dish are the long, slender types which are often referred to as Chinese, Filipino, or Japanese eggplants. However, they go by many other names as well. 


Thai Basil Eggplant

Sauce ingredients:
1/4 cup low-sodium soy sauce 
2 Tablespoons sugar
2 teaspoons Hoisin sauce or black bean garlic sauce
1-1/2 teaspoons cornstarch (or slightly less)

Other ingredients:
1-14 oz. package of firm tofu, drained and patted dry with a paper towel, optional
1 pound Chinese eggplant (about 2-3 large), roll cut** 1-inch pieces
1 red bell pepper, cut into 1-inch pieces
2 large cloves garlic, minced (about 2 teaspoons)
3 hot Thai chilies finely sliced or minced
1-2 cups fresh Thai basil leaves***
2 tablespoons vegetable or peanut oil
4 cups cooked brown rice or quinoa for serving

Instructions:

1. If using tofu, preheat oven to 425 degrees Fahrenheit. Then, cut the block of tofu width-wise into 7 slices, cut these in half to make 14 squares, then cut these at an angle to make 28 triangles. On a baking sheet covered with parchment (or brushed with oil), lay out tofu triangles in a single layer, not touching each other. Bake for 30 minutes, flipping halfway through cooking. 

2. Meanwhile, combine 1 1/2 cups water, soy sauce, sugar, and hoisin (or black bean garlic) sauce in a small bowl and stir. In a separate small bowl, combine 1/4 cup cold water and cornstarch; stir to dissolve and set aside.

3. Heat the oil over high heat in a large fry pan or wok; add the garlic and chilies, stir quickly and then add eggplant and peppers. Stir-fry for 2 minutes (or less if garlic starts to brown or burn). Then, add soy sauce mixture and continue stirring over high head until liquid reduces by half and eggplant is tender, about 3 minutes.  

4. Reduce heat to medium. Stir cornstarch mixture and then stir the mixture into the pan. Bring to simmer. Remove from heat and stir in Thai basil. 

5. Serve immediately with brown rice or quinoa.

Makes: 4 servings


What a roll cut vegetable looks like (example: roll cut carrot)*

**Roll-cut means to cut in irregular pieces, generally 1-2 inches in size. This is done by cutting on a bias, rolling the vegetable 90 degrees, and cutting on a bias through the middle of the previous cut. Don't worry, it doesn't have to be perfect. The goal is just to have more edges that if you'd sliced the vegetable because this will make the pieces less likely to stick to the side of the pan while cooking. 


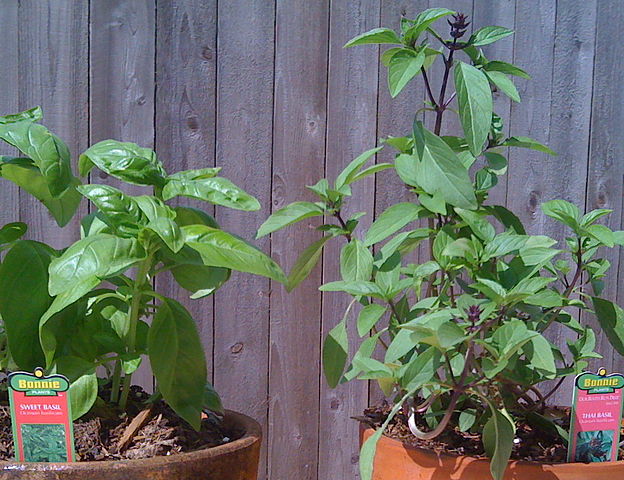
Left=Sweet (aka. Italian) Basil, Right=Thai basil*

***Thai basil looks similar to the sweet, Italian basil that you see in the grocery store, but you can tell them apart because the stems of Thai basil are purple (or at least partially purple) and the leaves are less shiny and rounded than sweet basil. The flavor of Thai basil also has a slight licorice or anise flavor and is more sharp, pronounced than sweet basil.


*Photo credits: (basket of eggplant) veggiegardeningtips.com, (Thai eggplant) vegaproduce.com, (roll cut carrot) finecooking.com, (Thai basil)  By SweetBasilOrThaiBasil0314.JPG: Cchatfieldderivative work: Cchatfield (talk) - SweetBasilOrThaiBasil0314.JPG, CC BY-SA 3.0, https://commons.wikimedia.org/w/index.php?curid=14867551.

Sunday, October 12, 2014

All Those Apples!

It's fall! You know what that means - Apples!


Apple pie, apple cider, apple donuts and apple fritters, apple cake...I sense a theme here.

I'm the first to admit that the first slice of apple pie made with freshly picked apples or warm, fresh-pressed cider on a cold day cannot be beat. Unfortunately, we can't - or more likely, shouldn't - live on sugary apple treats alone.

After pecks of apples have been picked, and baked and pressed, what can you make that's a bit more health-conscious? Beside the obvious - eating the apple as nature intended - here's a recipe that fits the bill and celebrates all things fall. Make as is for a delicious side dish or try one of the alternatives below to make it a meal.

See the Knife Skills Series - #2 Apples video to learn some techniques for using apples and to see how I chopped the apple for this recipe.

Knife Skills Series - #2 Apples


Fall Quinoa Apple Salad with Lemon Vinaigrette

Quinoa:
1-1/2 cups quinoa, uncooked
2-1/2 cups water

Lemon Vinaigrette:
2 medium lemons
1/3 cup olive oil
1/4 teaspoon kosher or sea salt
1/4 teaspoon freshly ground black pepper

Other salad ingredients:
1 Granny Smith Apple, cut into 1/2-inch pieces (do not peel)
1/2 cup dried cranberries
1/2 cup roasted walnuts, chopped
(see Fig post to learn how to roast nuts)
3/4 cup chopped flat-leaf parsley (about 1/2 bunch)
1/4 teaspoon kosher or sea salt
Freshly ground black pepper, to taste

Directions:
1. Bring water to boil in covered pot.

2. Meanwhile, rinse quinoa thoroughly with water by placing in a bowl of water, swishing around and draining with a strainer. Repeat the rinsing process. Shake as much of the water out of the quinoa (now in the strainer) on the final rinse.

3. Stir quinoa into boiling water and turn temperature down to medium-low. Cover pot again. Set timer for 12 minutes. Quinoa is done when the grain is nearly translucent or only a tiny white dot remains in the center.

4. Remove from heat and transfer quinoa to a medium-large mixing bowl. Let sit out until nearly room temperature or speed up cooling by placing the mixing bowl into the freezer. Stir occasionally until it reaches nearly room temperature (~15 minutes).

5. While quinoa is cooling, prepare remainder of the ingredients. Zest one of the lemons using either method shown below.

6. Then juice the lemons over the chopped apples in a small bowl. Do this over a strainer to catch seeds. Toss apples to coat with juice to prevent browning.

7. Holding apples back with your hand, drain lemon juice into a small jar or whatever container you plan to make vinaigrette in. I use a small canning jar so that I can shake the dressing to mix the oil and lemon juice before serving.

Lemon Vinaigrette - made in a canning jar.

8. Vinaigrette: To the lemon juice (about 1/4 cup), add olive oil, 1/4 teaspoon salt and 1/4 teaspoon pepper. Close lid tightly and shake to combine well immediately before each use. Alternatively, you can stir with a spoon but this doesn't work quite as well.

9. Add apples, walnuts, cranberries, parsley, lemon zest and 1/4 teaspoon salt to the mixing bowl of quinoa. After shaking vinaigrette to combine, measure out 1/4 cup of the dressing and drizzle over the quinoa mixture. Season with more pepper, if desired.  Stir to combine all ingredients.

Serves 6

Finished Fall Quinoa Apple Salad with Lemon Vinaigrette

Finished Fall Quinoa Apple Salad with Lemon Vinaigrette


Alternatives:
1. Make it a meal! Slice and cook vegetarian chicken breast substitute or 2-3 small-medium chicken breasts (see picture) and stir into quinoa salad. Use the extra lemon vinaigrette to dress salad greens. Serve quinoa salad over the salad greens.

I used 3 Gardein (vegetarian) "chicken" breasts in this picture:
Making it a Meal - add vegetarian or regular chicken breast, cutting into strips and browned.
Fall Quinoa Apple Salad with Gardein "Chicken"

Fall Quinoa Apple Salad with Gardein "Chicken" and Salad Greens tossed in remaining Lemon Vinaigrette


2. Substitute almonds, pistachios, cashews or pinenuts for walnuts.

3. Add other fall fruit like pomegranate arils or figs.  You can also substitute pears or another other crisp apple for the Granny Smith apples.

4. Make just the vinaigrette for use on any salad, or marinade for vegetables, fish or chicken.


Zesting Lemons 2 Ways

1. With a knife.

Take a paring knife and peel off only the outer, bright yellow, portion of the peel of a lemon (or any citrus fruit). Once you've peeled the lemon, then use a chef's knife to either chop very finely or slice into paper-thin strips.


2. With a microplane.

The tool in this picture looks like a wood rasp with a handle - that's because it is. In the cooking world, this is called a microplane. To get the fine zest pictured at 6 o'clock here, hold the lemon in one hand, microplane in the other, and either grate the microplane on the lemon or vise versa. This will remove only the very outer, flavorful portion of the lemon peel without any of the bitter, with pith.


Sunday, September 23, 2012

Really Delicious Roasted Cauliflower

A previous post featured a recipe for a spice mix foreign to most Americans - Ras-el-hanout.  On the accompanying video, I mentioned a few ways to use the mix.  One of these was on roasted cauliflower or Brussel sprouts.  Since it's officially fall, I figured it was time to share my recipe for roasted cauliflower.  It is the most delicious cauliflower I've ever had - hands' down.  You can use the same recipe to roast Brussel sprouts and lots of other fall and winter veggies.  You can also leave out the spice mix and just season with salt and pepper for a more basic dish.  Enjoy!

Dinner tonight: Red Quinoa, Ras-el-hanout Roasted Cauliflower and Edamame with Sun-dried Tomato and Red Pepper Spreads


Really Delicious Roasted Cauliflower

Ingredients:
1 large head cauliflower broken up into 1-2 inch florets
3 tablespoons olive oil
1-1/2 tablespoons lemon juice
1 tablespoon sliced garlic (about 5 cloves)
2 tablespoons spice mix (curry powder, ras-el-hanout, etc.)


Directions:
1. Preheat oven to 500 degrees Fahrenheit.
2. Spread cauliflower out in a single layer in a roasting pan.  Drizzle with olive oil and sprinkle with lemon juice and spice mix. 
3. Scatter garlic over the cauliflower and then toss or still well to coat cauliflower with all of the ingredients.

Ready for the oven

4. Roast for approximately 20 minutes or until cauliflower is staring to brown and there are crunchy bits on the bottom of the pan.  Stir a few times during cooking to ensure even cooking and prevent garlic from burning to the bottom of the pan.

What cauliflower looks like when it's finished


© Chef Michelle Hauser, MD, MPA

Thursday, May 3, 2012

Napa Valley: Healthy Kitchens, Healthy Lives, the Dessert Flip & Toasting Quinoa


Did you think I’d forgotten to post about the remaining days at Healthy Kitchens, Healthy Lives (HKHL)? Definitely not.  I’m a bit of an in-the-moment person and the intervening posts were just that.  With the piece published in the New York Times recently, thoughts of HKHL were brought back to the fore.  However, separate posts devoted to each of the four days after the fact seem too lengthy, so I’ll give you just enough detail about the remainder of the conference to whet your appetite.  Maybe you’ll be in the group of attendees in one of the years to come?  (Not so well kept secret: each year, there is talk of expanding to different locations, so if you’re not near Napa, attending may not be as far-fetched as you might now imagine.)

As mentioned in the previous HKHL post, the conference is geared toward a variety of professionals including physicians, nurses, dieticians, other healthcare professionals, chefs, insurance and healthcare executives, school foodservice directors, teachers, journalists, lawyers, business people, etc.  For this reason, there were full group events (aka. plenary sessions) that touched on interests of most and then breakout sessions to either discuss topics of more specialized interest (or just discuss them in a more intimate way) and, of course, to get our hands dirty in the kitchen!  It’s no surprise that the hands-on kitchen sessions were the highlight for most.  A close second - the winemakers in attendance who happily lubricated the conversation at tasting events throughout the weekend.   In my opinion, this was key.  While the group was technically international, the majority of folks were from two camps – laid back West Coast vs. suit and tie (and lots of Harvard professor types) East Coasters.  As someone that has now been part of both worlds for nearly 6 years each, I appreciated the age-old ability of wine and good food to erase (or at least blur) the line between the two camps.

A few well-received plenaries and workshops included: “What We Know About Opportunities to Optimize Our Diets” with Dr. Walter Willett, “The Latest Online Tools for Weight Management” with Dr. Mark Berman and “Food, Health, and Sustainability: A Range of Emerging Perspectives” with Dr. Christopher Gardner and a variety of other presenters.

The kitchen sessions covered everything from “Vegetables: Inspiration from World Cuisines” to “Healthy Cooking with Nuts & Legumes.”

Click here to see an example of the most recent schedule.

Pastry Chef Steven Durfee’s demonstations on the “dessert flip” have been a perennial favorite since the first HKHL conference in 2007.  What is a dessert flip?  It is the welcome invitation to do away with low-fat, fat-free, sugar-free, tasteless chemical-ridden substances that masquerade as desserts in supermarkets across the country and embrace the delicious, rich versions that the aforementioned are poor imitations of. 

How is this healthy?  Well, for starters, there are no 2,000 Calorie portions of cheesecake a la Cheesecake Factory.  The point is to have small portions of a decadent dessert you actually crave and serve it alongside a larger portion of something healthier, like berries, instead of the traditional large dessert with a mint leaf and single berry added for garnish.  For example, a bite-sized piece of cheesecake and a bowl of mixed berries, a couple chocolate-covered strawberries or dried fruit dipped in chocolate and nuts.  Another option is to reclaim a French standard – the fruit and cheese plate. 

Fruit and Cheese Plate
Photo courtesy of Salad Style
Does this really work? Sure it does.  Think of the last really amazing dish you ordered at a restaurant.  Which bites tasted the best?  The first ones.  I don’t know about you, but I’d much rather have those first two amazing bites of the real thing than a whole plate of an unattractive cardboard-like dessert.  The bonus – absolutely no guilt, because you didn’t gorge yourself.  Definitely a win-win.

Here are a couple pictures: (insert dessert flip pictures here – one with berries, one just showcasing small desserts)

Fresh Fig Tart with Blackberry Sauce and Cinnamon Cream
Photo courtesy of Diary of a Sweet Tooth

Mini Vanilla Cheesecake with Raspberry Couli and Fresh Raspberries

Photo courtesy of desertculinary
On to a more savory topic - Whole Grain Additions to Every Meal with Chef Tucker Bunch.  More specifically, quinoa.  I remember teaching cooking classes and looking out on blank faces when I said, “quinoa.”  No more.  It seems this grain has permeated menus across North America.  Quinoa originated in the Andes.  It was held to be sacred by the Incas.  Quinoa is gluten-free, high in protein and cooks quickly.  Unlike other wheat and rice, it contains all of the essential amino acids and thus is an especially good choice for vegetarians and vegans.  When I chatted with attendees of Chef Bunch’s class, the thing that most intrigued them was that grain could be toasted.  As someone who loves quinoa and lives with a skeptic who disliked the slightly vegetal flavor of plain quinoa, I’ve found that toasting the grain in oil to a medium brown before cooking in water or broth completely eliminates the vegetal quality and brings a savory earthiness to the grain that gives it wider appeal.  Below is a picture of quinoa toasting in a pan. 

Quinoa toasting in a saute pan

To toast, preheat the pan over medium heat, add a small amount of bland flavored oil that can stand up to some heat (like canola oil) and coat the pan with it while allowing the oil to heat, then add the quinoa to the pan in a single layer and stir occasionally until toasted.  You only need enough oil to barely coat the grains.  Below is a picture showing the difference in color between toasted and untoasted quinoa.


Left: Toasted quinoa, Right: Untoasted quinoa

The bonus: if you toast quinoa, there’s no need to rinse it ahead of cooking.  For those of you not accustomed to preparing quinoa, the raw grain has a bitter, naturally occurring, compound called saponin which makes it unpalatable to birds and insects and limits the need for pesticides.  It is easily removed by rinsing thoroughly prior to cooking in liquid or inactivated by toasting.  After toasting, add the appropriate amount of water for the amount of grain you’re making (to find grain to liquid ratios of most of the grains you’re likely to encounter, see the post on Cooking Whole Grains.  Quinoa, unlike most other whole grains, cooks quickly – generally in about 10-12 minutes.  Yep, that’s faster than white rice!  It’s no wonder that this grain - originally the fare of poor farm workers in South America - has now become so valuable that those that grow it can rarely afford it. However, it has also brought more money to those same workers.  Here's an article that gives more information on the nutritional benefits and political controversy surrounding the grain.  Since I started cooking with it in 2001, the price has increased by ten times.  Come to think of it, my frequent teaching about quinoa is not helping me hold down the price of my dinner!

Speaking of dinner, the picture below shows finished quinoa that I made for dinner the other night.

Quinoa Pilaf (made from half toasted and half untoasted grain) 

It is half toasted and half untoasted quinoa cooked in seasoned vegetable broth.  Quinoa is done just as the center of the grain is turning from opaque to brownish-clear and the curl around the edge is just beginning to unfurl on a few grains in the pan.  If most of the curls are unfurled, it’s a good bet that the quinoa will be on the mushy, overcooked side.  My approach is usually to bring the liquid to a boil, stir in the quinoa, cover the pan and immediately turn heat to the lowest setting, cook for 10 minutes and then pull the pan off the heat and let it rest at least 10 minutes while I’m finishing the other parts of the meal (or whatever else you feel like doing).  I then fluff the quinoa with a fork to break up any clumps of grains before serving.  This method usually produces perfectly cooked quinoa.


The final day was bittersweet, filled with thankfulness to have met new and caught up with old friends, made new business contacts, reconnected with the part of medicine I’m most passionate about, wined and dined, and, for me, returned to the part of the country that I consider home. It was hard to believe that the time had passed so quickly and it was time to return to the day-to-day responsibilities of being a medical resident in Boston.  For all of these reasons, Healthy Kitchens, Healthy Lives is a bit of a magical experience for those interested in changing lives for the healthier. 

Cheers!