At the farmer's market this weekend, tables were overflowing with eggplants of all shapes, sizes, and colors. They were truly a sight to behold in their different shades and combinations of purples, greens, and whites.
What seasoned cooks view with admiration and awe, is no doubt a source of anxiety and confusion for those starting out in the kitchen or new to eggplant cookery. To make matters worse, any specific type of eggplant may be called different names depending on where you buy it!
Have no fear!
The key to eggplant is to get the right shape for the recipe that you're making--regardless of color.
This is because those of the same shape tend to have the most similar taste, texture, and cooking methods. There are certainly subtle flavor differences between the varieties, however, a dish will generally turn out fine if you substitute a similar shape--but different size or color--eggplant variety.
Note: an exception is the small, round, green, Thai eggplant. This one is more crisp and has more small, pronounced seeds than the other varieties and is best not substituted.
The following is a home version of Thai Basil Eggplant--a dish you can find in many Thai restaurants. Don't be confused by the name. "Thai" refers to the type of basil used, NOT the type of eggplant. The best eggplants to use for this dish are the long, slender types which are often referred to as Chinese, Filipino, or Japanese eggplants. However, they go by many other names as well.
4. Reduce heat to medium. Stir cornstarch mixture and then stir the mixture into the pan. Bring to simmer. Remove from heat and stir in Thai basil.
**Roll-cut means to cut in irregular pieces, generally 1-2 inches in size. This is done by cutting on a bias, rolling the vegetable 90 degrees, and cutting on a bias through the middle of the previous cut. Don't worry, it doesn't have to be perfect. The goal is just to have more edges that if you'd sliced the vegetable because this will make the pieces less likely to stick to the side of the pan while cooking.
***Thai basil looks similar to the sweet, Italian basil that you see in the grocery store, but you can tell them apart because the stems of Thai basil are purple (or at least partially purple) and the leaves are less shiny and rounded than sweet basil. The flavor of Thai basil also has a slight licorice or anise flavor and is more sharp, pronounced than sweet basil.
 |
| Different varieties of eggplant* |
What seasoned cooks view with admiration and awe, is no doubt a source of anxiety and confusion for those starting out in the kitchen or new to eggplant cookery. To make matters worse, any specific type of eggplant may be called different names depending on where you buy it!
Have no fear!
The key to eggplant is to get the right shape for the recipe that you're making--regardless of color.
This is because those of the same shape tend to have the most similar taste, texture, and cooking methods. There are certainly subtle flavor differences between the varieties, however, a dish will generally turn out fine if you substitute a similar shape--but different size or color--eggplant variety.
 |
| Thai Eggplant* |
Note: an exception is the small, round, green, Thai eggplant. This one is more crisp and has more small, pronounced seeds than the other varieties and is best not substituted.
The following is a home version of Thai Basil Eggplant--a dish you can find in many Thai restaurants. Don't be confused by the name. "Thai" refers to the type of basil used, NOT the type of eggplant. The best eggplants to use for this dish are the long, slender types which are often referred to as Chinese, Filipino, or Japanese eggplants. However, they go by many other names as well.
 |
Thai Basil Eggplant
Sauce ingredients:
1/4 cup low-sodium soy sauce
2 Tablespoons sugar
2 teaspoons Hoisin sauce or black bean
garlic sauce
1-1/2 teaspoons cornstarch
(or slightly less)
Other ingredients:
1-14 oz. package of firm tofu, drained and patted dry with a paper towel, optional
1 pound Chinese eggplant (about 2-3 large), roll cut** 1-inch pieces
1 red bell pepper, cut into 1-inch pieces
2 large cloves garlic, minced (about 2 teaspoons)
3 hot Thai chilies finely sliced or minced
1-2 cups fresh Thai basil leaves***
2 tablespoons vegetable or
peanut oil
4 cups cooked brown rice or quinoa for serving
Instructions:
1. If using tofu, preheat oven to 425 degrees Fahrenheit. Then, cut the block of tofu width-wise into 7 slices, cut these in half to make 14 squares, then cut these at an angle to make 28 triangles. On a baking sheet covered with parchment (or brushed with oil), lay out tofu triangles in a single layer, not touching each other. Bake for 30 minutes, flipping halfway through cooking.
2. Meanwhile, combine 1 1/2 cups water,
soy sauce, sugar, and hoisin (or black bean garlic) sauce in a small bowl and stir. In a separate small bowl, combine 1/4 cup cold water and cornstarch; stir to dissolve and set aside.
3. Heat the oil over high
heat in a large fry pan or wok; add the garlic and chilies, stir quickly and
then add eggplant and peppers. Stir-fry for 2 minutes (or less if
garlic starts to brown or burn). Then, add soy sauce mixture and continue stirring
over high head until liquid reduces by half and eggplant is tender, about 3 minutes.
4. Reduce heat to medium. Stir cornstarch mixture and then stir the mixture into the pan. Bring to simmer. Remove from heat and stir in Thai basil.
5. Serve immediately with brown rice or quinoa.
Makes: 4 servings
 |
| What a roll cut vegetable looks like (example: roll cut carrot)* |
**Roll-cut means to cut in irregular pieces, generally 1-2 inches in size. This is done by cutting on a bias, rolling the vegetable 90 degrees, and cutting on a bias through the middle of the previous cut. Don't worry, it doesn't have to be perfect. The goal is just to have more edges that if you'd sliced the vegetable because this will make the pieces less likely to stick to the side of the pan while cooking.
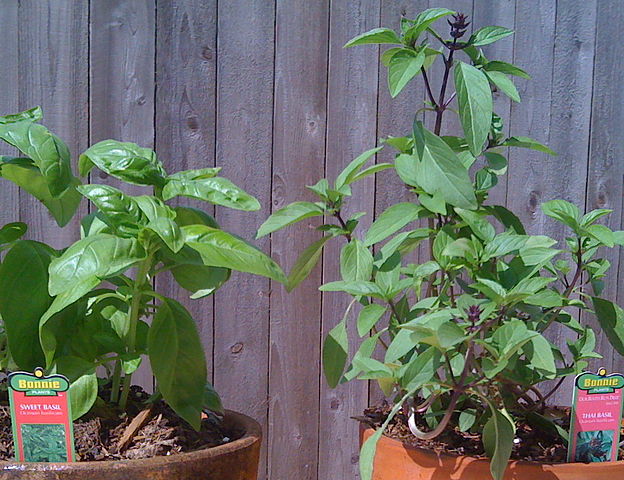 |
| Left=Sweet (aka. Italian) Basil, Right=Thai basil* |
***Thai basil looks similar to the sweet, Italian basil that you see in the grocery store, but you can tell them apart because the stems of Thai basil are purple (or at least partially purple) and the leaves are less shiny and rounded than sweet basil. The flavor of Thai basil also has a slight licorice or anise flavor and is more sharp, pronounced than sweet basil.
*Photo credits: (basket of eggplant) veggiegardeningtips.com, (Thai eggplant) vegaproduce.com, (roll cut carrot) finecooking.com, (Thai basil) By SweetBasilOrThaiBasil0314.JPG: Cchatfieldderivative work: Cchatfield (talk) - SweetBasilOrThaiBasil0314.JPG, CC BY-SA 3.0, https://commons.wikimedia.org/w/index.php?curid=14867551.


