Showing posts with label brown rice. Show all posts

Sunday, August 21, 2016

Thai Basil Eggplant

At the farmer's market this weekend, tables were overflowing with eggplants of all shapes, sizes, and colors. They were truly a sight to behold in their different shades and combinations of purples, greens, and whites. 


Different varieties of eggplant*

What seasoned cooks view with admiration and awe, is no doubt a source of anxiety and confusion for those starting out in the kitchen or new to eggplant cookery. To make matters worse, any specific type of eggplant may be called different names depending on where you buy it!

Have no fear! 

The key to eggplant is to get the right shape for the recipe that you're making--regardless of color. 

This is because those of the same shape tend to have the most similar taste, texture, and cooking methods. There are certainly subtle flavor differences between the varieties, however, a dish will generally turn out fine if you substitute a similar shape--but different size or color--eggplant variety. 
Thai Eggplant*

Note: an exception is the small, round, green, Thai eggplant. This one is more crisp and has more small, pronounced seeds than the other varieties and is best not substituted.

The following is a home version of Thai Basil Eggplant--a dish you can find in many Thai restaurants. Don't be confused by the name. "Thai" refers to the type of basil used, NOT the type of eggplant. The best eggplants to use for this dish are the long, slender types which are often referred to as Chinese, Filipino, or Japanese eggplants. However, they go by many other names as well. 


Thai Basil Eggplant

Sauce ingredients:
1/4 cup low-sodium soy sauce 
2 Tablespoons sugar
2 teaspoons Hoisin sauce or black bean garlic sauce
1-1/2 teaspoons cornstarch (or slightly less)

Other ingredients:
1-14 oz. package of firm tofu, drained and patted dry with a paper towel, optional
1 pound Chinese eggplant (about 2-3 large), roll cut** 1-inch pieces
1 red bell pepper, cut into 1-inch pieces
2 large cloves garlic, minced (about 2 teaspoons)
3 hot Thai chilies finely sliced or minced
1-2 cups fresh Thai basil leaves***
2 tablespoons vegetable or peanut oil
4 cups cooked brown rice or quinoa for serving

Instructions:

1. If using tofu, preheat oven to 425 degrees Fahrenheit. Then, cut the block of tofu width-wise into 7 slices, cut these in half to make 14 squares, then cut these at an angle to make 28 triangles. On a baking sheet covered with parchment (or brushed with oil), lay out tofu triangles in a single layer, not touching each other. Bake for 30 minutes, flipping halfway through cooking. 

2. Meanwhile, combine 1 1/2 cups water, soy sauce, sugar, and hoisin (or black bean garlic) sauce in a small bowl and stir. In a separate small bowl, combine 1/4 cup cold water and cornstarch; stir to dissolve and set aside.

3. Heat the oil over high heat in a large fry pan or wok; add the garlic and chilies, stir quickly and then add eggplant and peppers. Stir-fry for 2 minutes (or less if garlic starts to brown or burn). Then, add soy sauce mixture and continue stirring over high head until liquid reduces by half and eggplant is tender, about 3 minutes.  

4. Reduce heat to medium. Stir cornstarch mixture and then stir the mixture into the pan. Bring to simmer. Remove from heat and stir in Thai basil. 

5. Serve immediately with brown rice or quinoa.

Makes: 4 servings


What a roll cut vegetable looks like (example: roll cut carrot)*

**Roll-cut means to cut in irregular pieces, generally 1-2 inches in size. This is done by cutting on a bias, rolling the vegetable 90 degrees, and cutting on a bias through the middle of the previous cut. Don't worry, it doesn't have to be perfect. The goal is just to have more edges that if you'd sliced the vegetable because this will make the pieces less likely to stick to the side of the pan while cooking. 


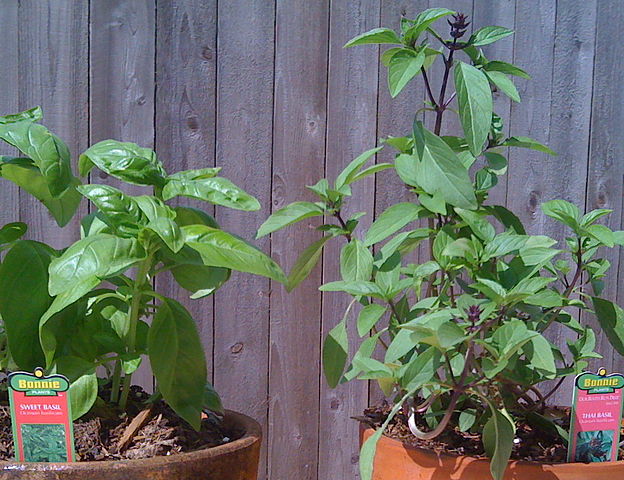
Left=Sweet (aka. Italian) Basil, Right=Thai basil*

***Thai basil looks similar to the sweet, Italian basil that you see in the grocery store, but you can tell them apart because the stems of Thai basil are purple (or at least partially purple) and the leaves are less shiny and rounded than sweet basil. The flavor of Thai basil also has a slight licorice or anise flavor and is more sharp, pronounced than sweet basil.


*Photo credits: (basket of eggplant) veggiegardeningtips.com, (Thai eggplant) vegaproduce.com, (roll cut carrot) finecooking.com, (Thai basil)  By SweetBasilOrThaiBasil0314.JPG: Cchatfieldderivative work: Cchatfield (talk) - SweetBasilOrThaiBasil0314.JPG, CC BY-SA 3.0, https://commons.wikimedia.org/w/index.php?curid=14867551.

Sunday, October 21, 2012

Quick Tip - Instant Brown Rice (that doesn't taste like it!)

Now that brown rice is becoming more mainstream, I hear fewer complaints from people about brown rice tasting different than white rice.  These complaints are often replaced by comments like, "I would eat brown rice, but it takes so long to cook!"  Having been in a time crunch myself for more years than I can count at this point, I came up with a solution that allows me to have great-tasting instant brown rice for most meals.  For other meals, I have a fun project for kids (or the kid-at-heart).

Affectionately called "rice castles" or "rice cubes" - ready to go into the freezer


1) First, choose a night when you'll be in the house for 45 minutes or so whether or not you plan to eat brown rice that night.

2) Rinse several cups of rice (enough for multiple meals) in a mesh strainer or swish in a bowl full of water.  Repeat until water is clear and drain well.

3) For each cup of brown rice you measured out and rinsed, add 1.75 cups water to a pot along with the rice.*  Add a pinch or two of salt (optional).

4) Bring to a boil, stir well, immediately turn to lowest possible heat and cover.  Set a timer for 35-40 minutes.

5) When timer goes off, remove pan from heat but DON'T UNCOVER.  Allow to sit at least 10 minutes before eating.  Rice continues to cook after removing it from heat.  

6) After resting, rice can be eaten.  Allow leftover rice (or all of the rice if not eating that day) to cool to a temperature you're comfortable handling it at.

7) Take a measuring cup the size of your usual serving of rice for 1 person (anywhere from 1/2-1 cup) and pack rice into in, then overturn measuring cup and tap the edge on a sheet pan to get your very own rice "sandcastle" to pop out.  Repeat with remaining rice until you run out.  

8) Place the sheet pan with all of your rice "castles" on it into the freezer and allow to freeze overnight. The following day, overturn sheet pan onto kitchen counter and rice "castles" will come off.  Put them into ziplock bags and store in the freezer for later use.  I can fit about 8 into a gallon ziplock bag.

9) For instant rice on another day, take one rice "castle" or "rice cube," as I'm fond of calling them, out of the ziplock bag.  Put it into a bowl, sprinkle a few drops of tap water over it, cover with a plate and heat in the microwave for 1-2 minutes.  The rice is ready and tastes freshly cooked.  This is MUCH better than that terrible instant rice you buy at the store either in the pantry or freezer sections. (That stuff tastes truly awful to me!)  


*NOTE: the amount of water listed here is less than it says on the bag/box of rice you purchased because most of us actually don't end up draining the rice very well and a lot of water clings to in.  In my experience making hundreds of batches of rice this way, the amount listed here will be more accurate if you rinse rice before cooking.  Rinsing rice before cooking helps produce cooked rice that doesn't turn into a mushy, sticky, pasty mess.

Sunday, January 29, 2012

Basic Techniques Series Intro & Lesson 1: Cooking Whole Grains

(imported and updated post from "A Chef in Med School" 9/11/2009)


Basic Techniques Introduction:

I’ve gotten to do a bit of teaching over the past couple of weeks, and several of the students’ questions inspired a series of posting on basic techniques for cooking grains and dry beans.  


Harvard Medical School Nutrition Course cooking demonstration setup 
(photo credit: Helen Delichatsios, MD)

Their questions stemmed from a discussion of what one could do to eat healthfully during intensely busy periods such as clinical rotations and residency.  I agree with the adage to write – or in this case, talk – about what you know, so in class, I attempted to describe some of the hearty, deli-style salads that I often make.  These salads usually include a mixture of grains and/or beans, vegetables and/or fruits, nuts, herbs, occasionally leftover grilled or baked tofu/tempeh (or choose your protein equivalent), and a sauce – generally a vinaigrette, but sometimes a nut-based sauce; combination of soy sauce, ginger and garlic or a creamy sauce that I make from either soy yogurt or blended tofu.  At the time, this verbal description seemed to leave me in a room of blank stares (clearly my fault!).  I promised to make up for the confusion with the following posts on “Cooking Whole Grains,” “Cooking Beans,” “Vinaigrettes,” and “Quick Deli-style Grain & Vegetable Salads – Demonstration of Southwestern Salad with Lime Vinaigrette.”


This video is the first of the Basic Techniques Series of videos that I will post intermittently with other cooking demonstrations. In this lesson, I use brown rice to illustrate the techniques and time-saving tips for cooking and storing whole grains – including how to make sure you have “instant” batches ready for quick meals or other culinary uses. The “Grain Cooking Chart” mentioned in the video, along with detailed directions are posted below.

--> SKIP TO "Basic Grains" and "Grains Chart" if you watched the video as the following few paragraphs are similar to the video content


When I am working or studying at home, I always put on a big pot of grains or beans to cook since both require very little hands-on time.  This is key to time management!  It allows me to use the grain/bean in a dish or two during that week and to store the remainder away in the freezer to use when I needed “instant” meals. 

What are these “instant meals” that I write of?  Essentially, I have fully cooked grains or beans that can be ready to add to anything after 1-2 minutes in the microwave.  For grains, I freeze individual servings (which I jokingly refer to as “rice cubes”) as described in the Directions for freezing and storing, below, and shown in the linked video.  (Beans are described in the Cooking Dried Beans blog post.) When I want as serving (or more) of rice, I remove the appropriate number of rice cubes from their ziplock bag in the freezer, put them into a microwave safe bowl, sprinkle with a drizzle of water (this gets the microwaves heating the food immediately and moistens the grain), cover and microwave on high for about 1-2 minutes.  Instantly, I have a healthful, whole-grain base for any number of my super quick stir-fries; chilis; or beans with salsa and shredded salad veggies – basically any purpose for which you would use rice or another grain.  I also sometimes just microwave long enough to defrost and toss the room temperature grain with some combination of chopped vegetables, fresh or dried fruits, herbs, beans, nuts or seeds and a dressing to make a deli-style salad.  The deli-style salad is actually a FANTASTIC time-saving, grab-and-go meal.  I recommend keeping one or two around at all times during busy weeks (see post on Deli-style Salads for more ideas and recipes).

Don’t be scared off by the long description of basic grain-cooking technique that follows.  The reason that it is long is NOT because it is difficult to cook grains, but because I wanted to give you AS MUCH DETAIL AS POSSIBLE so that YOU FEEL LIKE YOU HAVE A TEACHER IN THE KITCHEN WITH YOU.  Yes, there are many short recipes out there for basically the same thing – unfortunately, that just means that all the details of the steps are left out, with the writer making the assumption that everyone knows how to do them already.  Guess what – from my experience in teaching cooking, I run across very few people that know how to cook whole grains without one disaster or another.  Why do you think that so many people own rice cookers??  I can assure you that many people who have sworn to me that they cannot cook rice have near 100% success after learning the following techniques.  Once you read this through a time or two, you will never really need to look at anything aside from the chart at the end of the post or the grain to water ratio on the packages that you buy when cooking grains. 

Soon, you, too, will be able to come in the door from work/school/etc. take 5 minutes to pour grain and water into a pot and get it cooking away on its own while you do other things around the house.  That is basically all it takes to have many servings of a healthy, whole grain that is basically instant and on hand for future meals.  It is getting adept at time-saving strategies like this that allow me to cook nearly all of my own meals, eat healthfully, and maintain the busy schedule required of me in the essentially the same (often less) time that it takes to go out to eat – it is also MUCH cheaper that either eating out OR eating prepared/processed foods at home.

Basic Grains

These are the most basic cooking instructions for a variety of whole grains.  Liquids can be wholly or partially substituted with broths, vegetable or fruit juices, teas – creativity and individual tastes are the limit.  Be sure to decrease the salt (if using), when substituting salt-containing liquids for the water.

BASIC METHOD FOR WHOLE GRAINS
(see accompanying chart for specific grain information)

1. RINSE: two methods to choose from
-      Method 1: Measure grain (see chart below) into a fine mesh strainer and run cold water over it, shaking the strainer to make sure to rinse all of the grains (this takes about 30 seconds to 1 minute).  Shake a bit more to remove excess water that clings to the grains.
-      Method 2: Measure grain in a mixing bowl or other container much larger than the amount of grain, and fill the bowl with cool water.  Use your hands to swirl the grains in the water to rinse them.  Drain the water from the bowl slowly and the grains generally sink to the bottom.  When nearing the end of draining, use your hand with fingers spread just far enough apart to allow water, but not grain to flow between them – basically using your hand as a guard to prevent dumping the grains into the sink.
2. TRANSFER grains to a sauce pan (for up to 2 cups of dry grain) or stock/soup pot (for 3 cups or more of dry grain).
3. ADD WATER (or other liquid – can be hot or cold) and stir.
[NOTE: The amounts of liquid listed in the chart below for each grain may seem like slightly less than you are used to adding because the amounts have been adjusted for the liquid that clings to the grains after rinsing.  When a range is given (i.e. 1 to 1-1/2 cups), the lesser amount is for firmer, and the greater amount for softer, end product – choose depending on your preference.]
4. COOK: Place pot over high heat, uncovered, and bring to a rolling boil.  Stir thoroughly adding salt now, if using.  Immediately turn heat to the very lowest setting, cover the pot (use a dinner plate if you don’t have a lid that fits the pan), and set the timer.
5. STAND: When the timer goes off, remove pot from heat without uncovering, and allow to stand for time given in chart (more time is fine).  If you are cooking a grain that you haven’t cooked before, quickly test a grain to make sure it is tender before removing from heat to stand; try to keep the time that the lid is off of the pot to a minimum. 
6. SERVE OR STORE FOR LATER USE: Fluff with a fork and either serve or store as described below.
[NOTE: a couple of grains are best is fluffed prior to standing; they are noted in the “Standing time” column.]

*Soaked overnight: Grains on the chart marked with an asterisk (*) cook quicker and yield a superior product if soaked overnight before cooking.  To soak overnight: rinse grains as described in the directions above, but transfer to a bowl or other container that you can cover.  Cover the grains by at least 1 inch in cool water and place in the refrigerator overnight.  When you’re ready to cook the grains, drain the soaking liquid and proceed with the directions above, making sure to use the cooking time in the “Soaked overnight” column.

Notes for storing and freezing: Allow grains to cool to near room temperature before storing in the refrigerator or freezer.  These easily last 4 days when stored in a covered container in the refrigerator.  Alternatively, you can freeze leftovers in convenient single-serving sizes if you would like to have “instant” whole grains at your disposal.  To do this, use a ½ or 1-cup dry measuring cup, pack full of grain, invert onto a dinner plate or sheet pan (or whatever else fits into your freezer) repeating until you’ve done this with all of the leftover grain.  Place the plate/pan into the freezer and allow the servings of rice to freeze solid.  Remove the plate/pan from the freezer and transfer individual servings to an airtight plastic storage bag (you may need to run hot water over the bottom of the plate/pan to loosen the blocks of grain).  These individual servings are great to take for lunch or to use for a busy weeknight dinner – all that needs to be done is to microwave each portion for 1 to 2 minutes on high, and viola, instant (and very inexpensive), whole grains. 

Variations: any grain can be toasted in a dry pan, or with a bit of oil, over medium heat, stirring frequently, until it gives off a toasted aroma.


Grains Cooking Chart


1 Cup dry Grain
Water
Cooking Time (unsoaked)
Soaked overnight*
Yield (cups)
Standing time
RICE (all gluten-free)


Brown Rice (Long, medium or short grain; Basmati; Jasmine, Texmati, Sweet brown)
1-3/4 cups
35-40 min.

3
10 min.
Wehani rice (red rice)
1-3/4 cups
35-40 min.

3
10 min.
Wild Rice
2-1/2 to 2-3/4 cups
50-55 min.


10 min.
Forbidden rice
1-1/2 to 1-3/4 cups
30 min.

3
10 min.


OTHER GRAINS


Quinoa (gluten-free)
1-3/4 cups
12-15 min.

3-1/2
(fluff first) 10 min.
Amaranth (gluten-free)
2 to 2-1/2 cups
20 - 25 min.

3 to 3-1/2
10 min.
Teff (gluten-free)
3-1/2 to 3-3/4 cups
15 min.

3
(fluff first) 10 min.
Millet (gluten-free)
2-1/4 to 2-1/2 cups
20-30 min.

4
(fluff first) 10 min
Buckwheat, groats, roasted (gluten-free)
1-3/4 to 2 cups
20 min.

3.5
10 min.
Barley, hulled
3 to 3-1/2 cups
60 min.

3-1/2 to 4
10 min.
Barley, pearled
3 to 3-1/2 cups
60 min.

3 1/2-4
10 min.
Kamut*
2-1/2 to 3 cups
90 min.
30-45 min.
2-3/4
10 min.
Oat groats*
1-1/2 to 2 cups
1 hour
35 min.
2-1/2
10 min.
Rye, berries
3 to 3-1/2 cups
1-1/2 hours

3
10 min.
Spelt*
2-1/2 to 3 cups
1-1/2 to 2 hrs
45 min.
2-1/2
10 min.
Wheat Berries, Hard (Red)
2-1/2 to 3 cups
1-1/2 to 2 hrs

3
10 min.
Wheat Berries, Soft (White)
2-1/2 to 3 cups
1 hour

3
10 min.
Bulgur (alternate: steep - see below)
1-3/4 cups
10 min.

3
10 min.
Wheat, cracked
2-3/4 cups
20 min.

3
10 min.
GRAINS THAT CAN STEEP (don't rinse, just stir in boiling water, cover and rest for time given for "standing.")


Couscous, whole wheat
1-1/4 to 1-1/2 cups
1 min.

2-1/2
10 min.
Bulgur
2 cups boiling water


3
1 hour